|
Adding a User Interfact to Your Bitmap Plugin
Let's add a UI to the Dot at Center plugin
Imagine that we want to improve our "Dot at Center" plugin by adding a check box to it so that it can either draw the dot at center or draw a cross
on the selection.
Open Paint.NET, make a selection, and run Effects > Advanced > CodeLab. Open the DotAtCenter.cs file we saved at the end of the previous lesson.
Dot At Center
Here is our "Dot at Center" code that we ended the last lesson with:
protected override void OnRender(IBitmapEffectOutput output)
{
    using IEffectInputBitmap<ColorBgra32> sourceBitmap = Environment.GetSourceBitmapBgra32();
    using IBitmapLock<ColorBgra32> sourceLock = Environment.GetSourceBitmapBgra32().Lock(new RectInt32(0, 0, sourceBitmap.Size));
    RegionPtr<ColorBgra32> sourceRegion = sourceLock.AsRegionPtr();

    RectInt32 outputBounds = output.Bounds;
    using IBitmapLock<ColorBgra32> outputLock = output.LockBgra32();
    RegionPtr<ColorBgra32> outputSubRegion = outputLock.AsRegionPtr();
    var outputRegion = outputSubRegion.OffsetView(-outputBounds.Location);

    int canvasCenterX = Environment.Document.Size.Width / 2;
    int canvasCenterY = Environment.Document.Size.Height / 2;
    var selection = Environment.Selection.RenderBounds;
    int selectionCenterX = (selection.Right - selection.Left) / 2 + selection.Left;
    int selectionCenterY = (selection.Bottom - selection.Top) / 2 + selection.Top;

    // Loop through the output canvas tile
    for (int y = outputBounds.Top; y < outputBounds.Bottom; ++y)
    {
        if (IsCancelRequested) return;

        for (int x = outputBounds.Left; x < outputBounds.Right; ++x)
        {
			// Get your source pixel
			ColorBgra32 sourcePixel = sourceRegion[x,y];

			if (y == selectionCenterY && x == selectionCenterX)
			{
				sourcePixel = SrgbColors.Black;
			}
			// Save your pixel to the output canvas
			outputRegion[x,y] = sourcePixel;
        }
    }
}
The first thing you need to do is press Ctrl+I to open the UI Designer and add a check box. Follow the instructions on the
UI Designer page to add a check box with the name "Draw cross instead of dot" and a variable name of "Amount1".
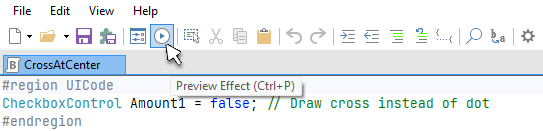
Once you're done with the designer and have clicked OK to update your script, you should see the following lines at the top of your script:
#region UICode
CheckboxControl Amount1 = false; // Draw cross instead of dot
#endregion
If your code doesn't look exactly like that, just copy and paste it from here.
Now that we have a check box on the screen, we need to write the code in our script that will draw a cross when the check box is checked. It's not too hard.
Go look at the inner most part of your x and y loops. You'll see this code:
// Get your source pixel
ColorBgra32 sourcePixel = sourceRegion[x,y];

if (y == selectionCenterY && x == selectionCenterX)
{
	sourcePixel = SrgbColors.Black;
}
// Save your pixel to the output canvas
outputRegion[x,y] = sourcePixel;
This always turns the center pixel black. We need to put a condition around that code so that it only runs if our check box is not checked. In order to make that
work, we now have a variable, "Amount1" that contains the state of the check box. It is a boolean variable that holds "false" for unchecked and "true" for checked.
// Get your source pixel
ColorBgra32 sourcePixel = sourceRegion[x,y];

if (!Amount1)
{
    if (y == selectionCenterY && x == selectionCenterX)
    {
	    sourcePixel = SrgbColors.Black;
    }
}
// Save your pixel to the output canvas
outputRegion[x,y] = sourcePixel;
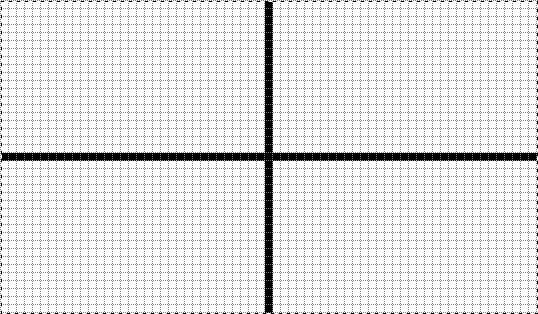
You can press Ctrl+P to preview the effect:
If you check and uncheck the check box, you'll notice that it only renders the dot at center when the check box is not checked. If so, it's working perfectly.
Next up, we need to write the code that runs when the check box is checked.
The code to draw a cross instead of just a dot is very simple. We just need to change the condition in the "if" statement from "&&" meaning AND to "||" meaning OR.
    if (y == selectionCenterY || x == selectionCenterX)
    {
	    sourcePixel = SrgbColors.Black;
    }
In order to trigger that code to run, we will put it just after our previous if statement and separate them with the "else" keyword:
// Get your source pixel
ColorBgra32 sourcePixel = sourceRegion[x,y];

if (!Amount1)
{
    if (y == selectionCenterY && x == selectionCenterX)
    {
	    sourcePixel = SrgbColors.Black;
    }
}
else
{
    if (y == selectionCenterY || x == selectionCenterX)
    {
	    sourcePixel = SrgbColors.Black;
    }
}
// Save your pixel to the output canvas
outputRegion[x,y] = sourcePixel;
You can preview your script again and play with the check box. Notice how the image changes when you change the check box? Exciting, right? That feeling is what keeps
us programmers going!
Your full script should look like this now:
#region UICode
CheckboxControl Amount1 = false; // Draw cross instead of dot
#endregion

protected override void OnRender(IBitmapEffectOutput output)
{
    using IEffectInputBitmap<ColorBgra32> sourceBitmap = Environment.GetSourceBitmapBgra32();
    using IBitmapLock<ColorBgra32> sourceLock = Environment.GetSourceBitmapBgra32().Lock(new RectInt32(0, 0, sourceBitmap.Size));
        RegionPtr<ColorBgra32> sourceRegion = sourceLock.AsRegionPtr();

    RectInt32 outputBounds = output.Bounds;
    using IBitmapLock<ColorBgra32> outputLock = output.LockBgra32();
        RegionPtr<ColorBgra32> outputSubRegion = outputLock.AsRegionPtr();
    var outputRegion = outputSubRegion.OffsetView(-outputBounds.Location);

    int canvasCenterX = Environment.Document.Size.Width / 2;
    int canvasCenterY = Environment.Document.Size.Height / 2;
    var selection = Environment.Selection.RenderBounds;
    int selectionCenterX = (selection.Right - selection.Left) / 2 + selection.Left;
    int selectionCenterY = (selection.Bottom - selection.Top) / 2 + selection.Top;

    // Loop through the output canvas tile
    for (int y = outputBounds.Top; y < outputBounds.Bottom; ++y)
    {
        if (IsCancelRequested) return;

        for (int x = outputBounds.Left; x < outputBounds.Right; ++x)
        {
            // Get your source pixel
            ColorBgra32 sourcePixel = sourceRegion[x,y];

            if (!Amount1)
            {
                if (y == selectionCenterY && x == selectionCenterX)
                {
                    sourcePixel = SrgbColors.Black;
                }
            }
            else
            {
                if (y == selectionCenterY || x == selectionCenterX)
                {
                    sourcePixel = SrgbColors.Black;
                }
            }

            // Save your pixel to the output canvas
            outputRegion[x,y] = sourcePixel;
        }
    }
}
Finishing Up
Once you've got that working, remember to save your script! I wouldn't want you to lose any of your hard work.
"File > Save" your DotAtCenter.cs file.
If you'd like to make that plugin a permanent part of your Paint.NET installation, read:
How to Build a DLL from a CodeLab script
How to install a DLL into Paint.NET
What's Next?
Now that you know a bit about the UI design, let's dig a little deeper and add another control to our UI!
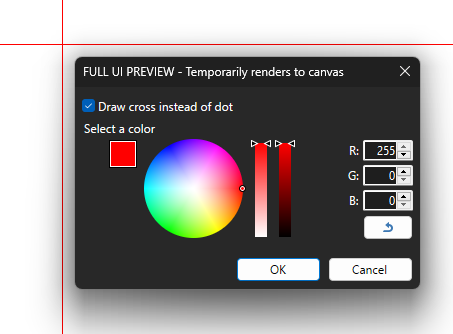
So far, the effect looks good and it useful, but what if we're working on a completely black canvas? Drawing a black dot or cross on that wouldn't do much. Let's add a color wheel control
to the UI so that we can change the color of the dot or cross.
The first thing you need to do is press Ctrl+I to open the UI Designer and add a color wheel control to the bottom of our list. Follow the instructions on the
UI Designer page to add a color wheel with the name "Select a color", a variable name of "Amount2", and
a default color of Black.
Once you're done with the designer and have clicked OK to update your script, you should see the following lines at the top of your script:
#region UICode
CheckboxControl Amount1 = false; // Draw cross instead of dot
ColorWheelControl Amount2 = ColorBgra.FromBgr(0, 0, 0); // [Black] Select a color
#endregion
If your code doesn't look exactly like that, just copy and paste it from here.
Now that we have a color wheel on the screen, we need to write the code in our script that will draw a cross in our selected color. It's not too hard.
Go look at the inner most part of your x and y loops. You'll see this code:
if (!Amount1)
{
	if (y == selectionCenterY && x == selectionCenterX)
	{
		sourcePixel = SrgbColors.Black;
	}
}
else
{
	if (y == selectionCenterY || x == selectionCenterX)
	{
		sourcePixel = SrgbColors.Black;
	}
}
Instead of using "SrgbColors.Black" just replace that with the variable "Amount2", like so:
if (!Amount1)
{
	if (y == selectionCenterY && x == selectionCenterX)
	{
		sourcePixel = Amount2;
	}
}
else
{
	if (y == selectionCenterY || x == selectionCenterX)
	{
		sourcePixel = Amount2;
	}
}
Be sure you changed it in both places! And, that's all there is to it!
If you've been following along, your final script should look like this:
#region UICode
CheckboxControl Amount1 = false; // Draw cross instead of dot
ColorWheelControl Amount2 = ColorBgra.FromBgr(0, 0, 0); // [Black] Select a color
#endregion

protected override void OnRender(IBitmapEffectOutput output)
{
    using IEffectInputBitmap<ColorBgra32> sourceBitmap = Environment.GetSourceBitmapBgra32();
    using IBitmapLock<ColorBgra32> sourceLock = Environment.GetSourceBitmapBgra32().Lock(new RectInt32(0, 0, sourceBitmap.Size));
        RegionPtr<ColorBgra32> sourceRegion = sourceLock.AsRegionPtr();

    RectInt32 outputBounds = output.Bounds;
    using IBitmapLock<ColorBgra32> outputLock = output.LockBgra32();
        RegionPtr<ColorBgra32> outputSubRegion = outputLock.AsRegionPtr();
    var outputRegion = outputSubRegion.OffsetView(-outputBounds.Location);

    int canvasCenterX = Environment.Document.Size.Width / 2;
    int canvasCenterY = Environment.Document.Size.Height / 2;
    var selection = Environment.Selection.RenderBounds;
    int selectionCenterX = (selection.Right - selection.Left) / 2 + selection.Left;
    int selectionCenterY = (selection.Bottom - selection.Top) / 2 + selection.Top;

    // Loop through the output canvas tile
    for (int y = outputBounds.Top; y < outputBounds.Bottom; ++y)
    {
        if (IsCancelRequested) return;

        for (int x = outputBounds.Left; x < outputBounds.Right; ++x)
        {
            // Get your source pixel
            ColorBgra32 sourcePixel = sourceRegion[x,y];

            if (!Amount1) // Draw single dot
            {
                if (y == selectionCenterY && x == selectionCenterX)
                {
                    sourcePixel = Amount2;
                }
            }
            else // Draw cross instead
            {
                if (y == selectionCenterY || x == selectionCenterX)
                {
                    sourcePixel = Amount2;
                }
            }

            // Save your pixel to the output canvas
            outputRegion[x,y] = sourcePixel;
        }
    }
}
Go ahead and press Ctrl+P to preview your effect. It should look something like this:
Finishing Up
Once you've got that working, remember to save your script! I wouldn't want you to lose any of your hard work.
"File > Save" your DotAtCenter.cs file.
If you'd like to make that plugin a permanent part of your Paint.NET installation, read:
How to Build a DLL from a CodeLab script
How to install a DLL into Paint.NET
What's Next?
Head back to the Tutorial Index to learn something else
Donate
The best way to say "Thanks" for teaching you something here, is to fill out this form. It uses PayPal to process your donation. You don't need a PayPal account, just a credit/debit card will do.
If PayPal doesn't work for you, no need to worry--just enjoy the tutorials for free!
Thank you for your donation. I don't get many, so you can be sure I really appreciate yours!
|
|
|
News
CodeLab 6.12 Released
(February 11, 2024)
This latest release of CodeLab for Paint.NET includes the
ability to write GPU accelerated plugins.
More...
Double-Six Dominoes 3.1
(May 10, 2021)
This long-awaited refresh of the most popular dominoes game
on Download.com is now available!
More...
HTML Editor 1.5 Released
(March 31, 2016)
This latest release is a complete rewrite adding a wysiwyg editor mode and a much improved UI.
More...
|
|
|
|
|
|