|
Premultiplied vs. Straight Alpha
When to use each type in Paint.NET plugins
In GPU accelerated effects there are two different ways to store the opacity of a color value, Straight Alpha and Premultiplied Alpha.
Up until this lesson, we really haven't considered it. But, I will tell you that Paint.NET stores the main canvas in Straight Alpha and
many Direct2D effects take Premultiplied Alpha for their input. So, Paint.NET converts the main canvas into Premultiplied Alpha before it
gives it to you in your effect. Then, once you return a Premultiplied Alpha image it converts it to Straight Alpha for use again in Paint.NET.
Since Paint.NET stores pixels in Straight Alpha, this is the format that you are already used to using. Let's take a look at the specifics of
each format:
Straight Alpha
In Straight Alpha, the RGB values specify the color of the thing being drawn and the alpha value specifies how solid it is.
In this mode, RGB and alpha are independent--you can change one without affecting the other. In fact, to make an object fade out, you would gradually
reduce its alpha value while leaving the RGB values unchanged.
Premultiplied Alpha
In Premultiplied Alpha, the RGB values specify how much color the thing being drawn contributes to the output and the alpha value
specifies how much it obscures whatever is behind it.
In this mode, RGB and alpha are tightly coupled. To make an object transparent you must reduce both its RGB (to contribute less color) and also its
alpha (to obscure less of whatever is behind it). Fully transparent objects no longer have any color at all, so there is only one value that
represents 100% transparency: RGB and alpha all zero.
Most of the above was copied from https://microsoft.github.io/Win2D/WinUI3/html/PremultipliedAlpha.htm
Converting Between Premultiplied Alpha and Straight Alpha
Normally, when writing an effect, I just keep everything in Premultiplied Alpha when chaining effects together.
That said, if I am manipulating the R, G, B, or Alpha values of individual pixels directly, I convert to Straight Alpha first as
that is the mode I'm most familiar with--that is, since RGB and A are independent, I understand how to manipulate the channels
directly.
To convert between the two modes, PremultiplyEffect or UnPremultiplyEffect can be used.
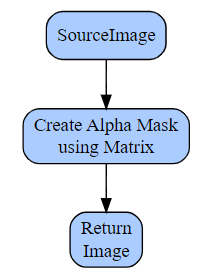
For example, let's design and implement an effect that manipulates the R, G, B, and A channels. Here is the Create Alpha Mask
effect:
Since I'm going to be manipulating the RGB and A values directly using the Matrix effect, I'm going to convert from
Premultiplied Alpha to Straight Alpha first, then convert back:
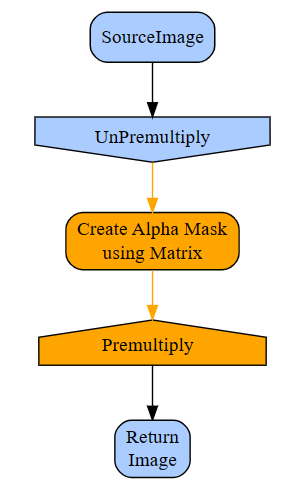
In this plan, the steps dealing with Premultiplied Alpha are colored blue and the steps dealing with Straight Alpha are colored orange.
Let's see how this might be coded:
#region UICode
CheckboxControl Amount1 = false; // Inverse mask
#endregion

protected override IDeviceImage OnCreateOutput(IDeviceContext deviceContext)
{
    UnPremultiplyEffect unPremultiplyEffect = new UnPremultiplyEffect(deviceContext);
    unPremultiplyEffect.Properties.Input.Set(Environment.SourceImage);

    ColorMatrixEffect colorMatrixEffect = new ColorMatrixEffect(deviceContext);
    colorMatrixEffect.Properties.Input.Set(unPremultiplyEffect);
    colorMatrixEffect.Properties.ColorMatrix.SetValue(
        new Matrix5x4Float(
                0, 0, 0, 0,
                0, 0, 0, 0,
                0, 0, 0, 0,
                1, 1, 1, 0, // multiply alpha channel by zero
                0, 0, 0, 1) // and then add one
    );

    PremultiplyEffect premultiplyEffect = new PremultiplyEffect(deviceContext);
    premultiplyEffect.Properties.Input.Set(colorMatrixEffect);

    if (!Amount1)
    {
        return premultiplyEffect;
    }

    InvertEffect invertEffect = new InvertEffect(deviceContext);
    invertEffect.Properties.Input.Set(premultiplyEffect);
    return invertEffect;
}
Finishing Up
Once you've got that working, remember to save your script! I wouldn't want you to lose any of your hard work.
"File > Save" your AlphaMask.cs file.
If you'd like to make that plugin a permanent part of your Paint.NET installation, read:
How to Build a DLL from a CodeLab script
How to install a DLL into Paint.NET
Before you move on to another lesson, let's see how that code actually works.
The Matrix Effect
Let's take a closer look at one of the parameters to the Color Matrix Effect, the 5x4 matrix itself.
The first row has the pixel's Red value as input with a range of 0 (no red) to 1 (fully red). Each column of the first row is MULTIPLIED with that red value.
The first value is the Red output value, the second is the Green output value, the third value is the Blue output value, and the last is the alpha output value.
The second row is the Green input row. The third row is the Blue input row. And, the fourth row is the Alpha input row.
The fifth row is special, after each column is multiplied with the input value, the amount in the fifth row is ADDED to the pixel's channel value.
So, each row corresponds to R, G, B, and A inputs and the columns correspond to R, G, B, and A outputs.
I know that's a lot to take in and understand. Take your time on that one. Maybe this will make things a little more clear:
Here is an "identity" matrix:
1, 0, 0, 0,
0, 1, 0, 0,
0, 0, 1, 0,
0, 0, 0, 1,
0, 0, 0, 0
"Identity" in the mathmatical sense as no change would be made to your image. As you can see on the first row, the Red input would be multiplied by 1 for the Red output
and nothing would be added to it on the 5th row. On the second row, the Green input value would be multiplied by 0 for the Red output and 1 for the Green output, etc.
So, looking that the matrix in the Mask plugin above, the R, G, and B inputs are all multiplied by 0 for all outputs meaning the color of an input pixel will not affect
the output of that pixel at all. However, the Alpha value of each input pixel will be multiplied by 1 for each output pixel channel thus giving us a shade of gray
corresponding to the alpha value of the input pixel. Finally, the alpha value of that pixel will be multiplied by 0 to clear it out and then 1 will be added to it resulting
in a fully opaque shade of gray for your final output.
The matrix values don't need to be 0 or 1, any float value will do. Here's the matrix I used in my Flames effect to color gray flames a shade of red:
1,           0,   0,  0,
0,     2.2173f,   0,  0,
0,           0,  5f,  0,
0,           0,   0,  1,
0, -1.2172977f, -4f,  0
It does some pretty strange calculations to the Green and Blue channels, but the Red and Alpha, you'll notice, are "identity" columns (unchanged).
The Swizzle Effect
Now that we've made a mask layer, how would we apply that mask to another layer? Let's design another effect, Apply Mask!
In this effect, we will take a layer with shades of gray on it and apply that as the alpha values of our current layer. Like this:
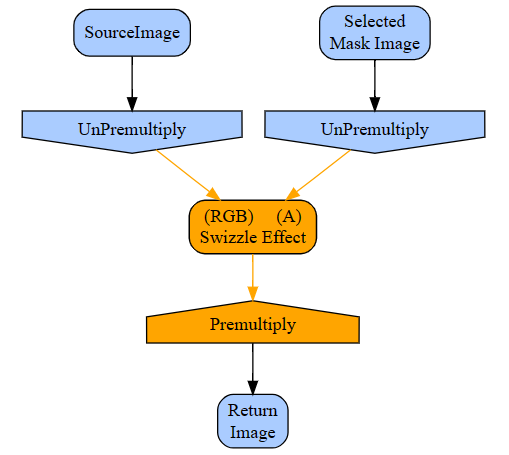
The Swizzle Effect can be used to switch around channels from multiple images including using the R, G, and B channels from one image and the Alpha channel from another.
Go ahead and start Paint.NET, open a multilayer image (preferably one that contains a mask layer), and run CodeLab. Create a new GPU Image effect.
The first thing you need to do is press Ctrl+I to open the UI Designer and add a Layer Control. Follow the instructions on the
UI Designer page to add an Layer Control with the name "Mask Layer", a variable name of "Amount1".
Once you're done with the designer and have clicked OK to update your script, you should see the following lines at the top of your script:
#region UICode
LayerControl Amount1 = 0; // Mask Layer
#endregion

protected override IDeviceImage OnCreateOutput(IDeviceContext deviceContext)
{
    // TODO: replace this return statement with your GPU pipeline algorithm
    return Environment.SourceImage;
}
If your code doesn't look exactly like that, just copy and paste it from here.
Now that we have a Layer Chooser on the screen, we need to update the code in our script to use it. It's not too hard.
The first thing we need to do when using a Layer Chooser is to clamp the layer number. This is in case our effect is run by pressing Ctrl+F (to repeat the last effect)
and the number of layers of our pdn file has changed. Put the following at the top of your OnCreateOutput() function:
// If run by Ctrl+F and the number of layers has changed...
int maskLayer = Amount1.Clamp(0,Environment.Document.Layers.Count-1);
Next, we need to retrieve the mask layer image into a variable so we can use it in our effect:
// Get selected layer
IDeviceImage maskImage = Environment.Document.Layers[maskLayer].Image;
Before we use the Swizzle Effect, we need to convert our Source Image and our Mask Layer into Straight Alpha:
// Convert to Straight Alpha
UnPremultiplyEffect unPremultiplySourceImage = new UnPremultiplyEffect(deviceContext);
unPremultiplySourceImage.Properties.Input.Set(Environment.SourceImage);

UnPremultiplyEffect unPremultiplyMaskImage = new UnPremultiplyEffect(deviceContext);
unPremultiplyMaskImage.Properties.Input.Set(maskImage);
Now that everything's ready to go, we can define our Swizzle Effect:
InputSwizzleEffect inputSwizzleEffect = new InputSwizzleEffect(deviceContext);
inputSwizzleEffect.Properties.AlphaMode.SetValue(InputSwizzleAlphaMode.Straight);
inputSwizzleEffect.InputCount = 2;
inputSwizzleEffect.SetInput(0, unPremultiplySourceImage);
inputSwizzleEffect.SetInput(1, unPremultiplyMaskImage);
We specify our two inputs, the Source Image and the Mask Image.
Next, we need to specify what kind of "swizzle" we want to perform. We need to specify the source image for each of the R, G, B, and Alpha channels:
inputSwizzleEffect.Properties.RedInputIndex.SetValue(0);
inputSwizzleEffect.Properties.GreenInputIndex.SetValue(0);
inputSwizzleEffect.Properties.BlueInputIndex.SetValue(0);
inputSwizzleEffect.Properties.AlphaInputIndex.SetValue(1);
The defaults for all of those channels is the corresponding channel in the source image. So, if you want the source blue channel to end up on the destination blue channel, the defaults will do.
For us though, we want the shade of gray from the Mask Layer to end up on the Alpha channel. Since our mask is a shade of gray, the R, G, and B channels will all be the same, so we will
arbitrarily pick the R channel to be the Alpha channel in our result:
inputSwizzleEffect.Properties.AlphaInputChannel.SetValue(ChannelSelector.R);
The only thing left to do is to return the output of the Swizzle Effect so we can see the results:
return inputSwizzleEffect;
If you've been following along, your script should look like this:
#region UICode
LayerControl Amount1 = 0; // Layer
#endregion

protected override IDeviceImage OnCreateOutput(IDeviceContext deviceContext)
{
    // If run by Ctrl+F and the number of layers has changed...
    int maskLayer = Amount1.Clamp(0,Environment.Document.Layers.Count-1);

    // Get selected layer
    IDeviceImage maskImage = Environment.Document.Layers[maskLayer].Image;

    // Convert to Straight Alpha
    UnPremultiplyEffect unPremultiplySourceImage = new UnPremultiplyEffect(deviceContext);
    unPremultiplySourceImage.Properties.Input.Set(Environment.SourceImage);

    UnPremultiplyEffect unPremultiplyMaskImage = new UnPremultiplyEffect(deviceContext);
    unPremultiplyMaskImage.Properties.Input.Set(maskImage);

    // Apply Alpha Mask
    InputSwizzleEffect inputSwizzleEffect = new InputSwizzleEffect(deviceContext);
    inputSwizzleEffect.Properties.AlphaMode.SetValue(InputSwizzleAlphaMode.Straight);
    inputSwizzleEffect.InputCount = 2;
    inputSwizzleEffect.SetInput(0, unPremultiplySourceImage);
    inputSwizzleEffect.SetInput(1, unPremultiplyMaskImage);
    inputSwizzleEffect.Properties.RedInputIndex.SetValue(0);
    inputSwizzleEffect.Properties.GreenInputIndex.SetValue(0);
    inputSwizzleEffect.Properties.BlueInputIndex.SetValue(0);
    inputSwizzleEffect.Properties.AlphaInputIndex.SetValue(1);
    inputSwizzleEffect.Properties.AlphaInputChannel.SetValue(ChannelSelector.R);

    return inputSwizzleEffect;
}
And, that's it!
Finishing Up
Once you've got that working, remember to save your script! I wouldn't want you to lose any of your hard work.
"File > Save" your ApplyMask.cs file.
If you'd like to make that plugin a permanent part of your Paint.NET installation, read:
How to Build a DLL from a CodeLab script
How to install a DLL into Paint.NET
What's Next?
For more info about alpha composition, read this article: https://en.wikipedia.org/wiki/Alpha_compositing
Or, head back to the Tutorial Index to learn something else
Donate
The best way to say "Thanks" for teaching you something here, is to fill out this form. It uses PayPal to process your donation. You don't need a PayPal account, just a credit/debit card will do.
If PayPal doesn't work for you, no need to worry--just enjoy the tutorials for free!
Thank you for your donation. I don't get many, so you can be sure I really appreciate yours!
|
|
|
News
Sudoku 1.0 Released
(July 1, 2025)
Solve sudoku puzzles for fun! Over 200 puzzles at all levels included.
More...
CodeLab 6.13 Released
(November 17, 2024)
This latest release of CodeLab for Paint.NET includes the
ability to write GPU accelerated plugins.
More...
Double-Six Dominoes 3.1
(May 10, 2021)
This long-awaited refresh of the most popular dominoes game
on Download.com is now available!
More...
|
|
|
|
|
|