|
Adding a User Interfact to Your GPU Image Plugin
Let's add a UI to the Dream plugin
Imagine that we want to improve our "Dream" plugin by adding a integer slider to it so that you can control the amount of blur.
Open Paint.NET, open an image, and run Effects > Advanced > CodeLab. Open the Dream.cs file we saved at the end of the previous lesson.
Dream
Here is our "Dream" plugin code that we ended the last lesson with:
protected override IDeviceImage OnCreateOutput(IDeviceContext deviceContext)
{
    GaussianBlurEffect blurEffect = new GaussianBlurEffect(deviceContext);
    blurEffect.Properties.Input.Set(Environment.SourceImage);
    blurEffect.Properties.StandardDeviation.SetValue(StandardDeviation.FromRadius(12));

	MixEffect mixEffect = new MixEffect(deviceContext);
    mixEffect.Properties.Destination.Set(Environment.SourceImage);
    mixEffect.Properties.Source.Set(blurEffect);
	mixEffect.Properties.Mode.SetValue(MixMode.BlendDarken);
	return mixEffect;
}
The first thing you need to do is press Ctrl+I to open the UI Designer and add a slider. Follow the instructions on the
UI Designer page to add an integer slider with the name "Focus", a variable name of "Amount1", a minimum of 2,
a maximum of 100 and a default of 12.
Once you're done with the designer and have clicked OK to update your script, you should see the following lines at the top of your script:
#region UICode
IntSliderControl Amount1 = 12; // [2,100] Focus
#endregion
If your code doesn't look exactly like that, just copy and paste it from here.
Now that we have a slider on the screen, we need to update the code in our script to use it. It's not too hard.
Go look at the GaussianBlurEffect section. You'll see this code:
GaussianBlurEffect blurEffect = new GaussianBlurEffect(deviceContext);
blurEffect.Properties.Input.Set(Environment.SourceImage);
blurEffect.Properties.StandardDeviation.SetValue(StandardDeviation.FromRadius(12));
As you can see, this is hard coded to always use a Radius of 12. In order to make that settable, we just need to use the "Amount1" variable that is tied to our
new slider. In your script, replace "12" with "Amount1", like this:
GaussianBlurEffect blurEffect = new GaussianBlurEffect(deviceContext);
blurEffect.Properties.Input.Set(Environment.SourceImage);
blurEffect.Properties.StandardDeviation.SetValue(StandardDeviation.FromRadius(Amount1));
You can press Ctrl+P to preview the effect and play with the slider to see how it works.
Your full script should look like this now:
#region UICode
IntSliderControl Amount1 = 12; // [2,100] Focus
#endregion

protected override IDeviceImage OnCreateOutput(IDeviceContext deviceContext)
{
    GaussianBlurEffect blurEffect = new GaussianBlurEffect(deviceContext);
    blurEffect.Properties.Input.Set(Environment.SourceImage);
    blurEffect.Properties.StandardDeviation.SetValue(StandardDeviation.FromRadius(Amount1));

	MixEffect mixEffect = new MixEffect(deviceContext);
    mixEffect.Properties.Destination.Set(Environment.SourceImage);
    mixEffect.Properties.Source.Set(blurEffect);
	mixEffect.Properties.Mode.SetValue(MixMode.BlendDarken);
	return mixEffect;
}
Finishing Up
Once you've got that working, remember to save your script! I wouldn't want you to lose any of your hard work.
"File > Save" your Dream.cs file.
If you'd like to make that plugin a permanent part of your Paint.NET installation, read:
How to Build a DLL from a CodeLab script
How to install a DLL into Paint.NET
What's Next?
Now that you know a bit about the UI design, let's dig a little deeper and design and implement a more complicated effect!
Paint.NET has lots of little Adjustments. Let's make an effect that puts them all on the same screen. That way you can adjust
the Brightness/Contrast while you are adjusting the Temperature/Tint settings.
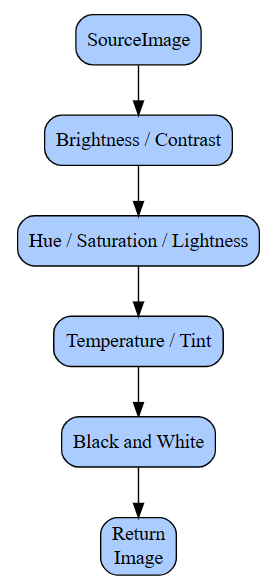
Here's the plan for our effect:
Now that we have a plan, let's get started!
Open Paint.NET, open an image, and run Effects > Advanced > CodeLab. In CodeLab, File > New > GPU Image Effect. This will
start a new GPU accelerated image effect. The next thing you need to do is press Ctrl+I to open the
UI Designer and add the following controls:
• "Brightness", Int slider, brightnessAmount, black to white, -100, 0, 100
• "Contrast", Int slider, contrastAmount, default, -100, 0, 100
• "Hue", Int slider, hueAmount, hue centered, -180, 0, 180
• "Saturation", Int slider, saturationAmount, saturation, 0, 100, 200
• "Lightness", Int slider, lightnessAmount, black to white, -100, 0, 100
• "Temperature", Int slider, temperatureAmount, cyan to orange, -100, 0, 100
• "Tint", Int slider, tintAmount, magenta to green, -100, 0, 100
• "Black and White", check box, bwAmount, unchecked=0
• "Preview original image", check box, previewAmount, unchecked=0
Once you're done with the designer and have clicked OK to update your script, you should see the following lines at the top of your script:
#region UICode
IntSliderControl brightnessAmount = 0; // [-100,100,5] Brightness
IntSliderControl contrastAmount = 0; // [-100,100] Contrast
IntSliderControl hueAmount = 0; // [-180,180,2] Hue
IntSliderControl saturationAmount = 100; // [0,200,3] Saturation
IntSliderControl lightnessAmount = 0; // [-100,100,5] Lightness
IntSliderControl temperatureAmount = 0; // [-100,100,9] Temperature
IntSliderControl tintAmount = 0; // [-100,100,7] Tint
CheckboxControl bwAmount = false; // Black and White
CheckboxControl previewAmount = false; // Preview original image
#endregion
If your code doesn't look exactly like that, just copy and paste it from here.
Now that we have a bunch of controls on the screen, we need to write the code in our script that will make them work. It's not too hard.
The first thing we're going to code is the last UI element, the "Preview original image" check box. Starting with our script:
// TODO: replace this return statement with your GPU pipeline algorithm
return Environment.SourceImage;
We just need to put a condition around that return statement, like so:
if (previewAmount)
{
	return Environment.SourceImage;
}
This will return the unmodified image if the "Preview original image" check box is checked.
If you've been following along, your current script should look like this:
#region UICode
IntSliderControl brightnessAmount = 0; // [-100,100,5] Brightness
IntSliderControl contrastAmount = 0; // [-100,100] Contrast
IntSliderControl hueAmount = 0; // [-180,180,2] Hue
IntSliderControl saturationAmount = 100; // [0,200,3] Saturation
IntSliderControl lightnessAmount = 0; // [-100,100,5] Lightness
IntSliderControl temperatureAmount = 0; // [-100,100,9] Temperature
IntSliderControl tintAmount = 0; // [-100,100,7] Tint
CheckboxControl bwAmount = false; // Black and White
CheckboxControl previewAmount = false; // Preview original image
#endregion

protected override IDeviceImage OnCreateOutput(IDeviceContext deviceContext)
{
    if (previewAmount)
    {
        return Environment.SourceImage;
    }
}
Let's get started on the real "meat" of the plan. The first effect we will need is the "Brightness / Contrast" effect. Define the effect
like this:
PdnBrightnessContrastEffect pdnBrightnessContrastEffect = new PdnBrightnessContrastEffect(deviceContext);
Next, fill in the required parameters (remembering to use our UI variables to control all of the settings) including the source image
as the input since that's where we're starting.
pdnBrightnessContrastEffect.Properties.Input.Set(Environment.SourceImage);
pdnBrightnessContrastEffect.Properties.Brightness.SetValue(brightnessAmount / 100f);
pdnBrightnessContrastEffect.Properties.Contrast.SetValue(contrastAmount / 100f);
When using the brightnessAmount and contrastAmount variables, we divide by 100 to convert the values from -100 to 100 (as shown on the
screen to -1 to 1 which is required for the effect. We're going to be doing that a lot.
We will place that code just under the "if" statement block. So far, our script should look like this:
#region UICode
IntSliderControl brightnessAmount = 0; // [-100,100,5] Brightness
IntSliderControl contrastAmount = 0; // [-100,100] Contrast
IntSliderControl hueAmount = 0; // [-180,180,2] Hue
IntSliderControl saturationAmount = 100; // [0,200,3] Saturation
IntSliderControl lightnessAmount = 0; // [-100,100,5] Lightness
IntSliderControl temperatureAmount = 0; // [-100,100,9] Temperature
IntSliderControl tintAmount = 0; // [-100,100,7] Tint
CheckboxControl bwAmount = false; // Black and White
CheckboxControl previewAmount = false; // Preview original image
#endregion

protected override IDeviceImage OnCreateOutput(IDeviceContext deviceContext)
{
    if (previewAmount)
    {
        return Environment.SourceImage;
    }

    PdnBrightnessContrastEffect pdnBrightnessContrastEffect = new PdnBrightnessContrastEffect(deviceContext);
    pdnBrightnessContrastEffect.Properties.Input.Set(Environment.SourceImage);
    pdnBrightnessContrastEffect.Properties.Brightness.SetValue(brightnessAmount / 100f);
    pdnBrightnessContrastEffect.Properties.Contrast.SetValue(contrastAmount / 100f);
}
Now that you've gotten the hang of it, we'll go a little faster now.
Next up, we'll need the "Hue / Saturation / Lightness" effect:
PdnHueSaturationLightnessEffect saturationEffect = new PdnHueSaturationLightnessEffect(deviceContext);
saturationEffect.Properties.Input.Set(pdnBrightnessContrastEffect);
saturationEffect.Properties.HueAngleDelta.SetValue(hueAmount);
saturationEffect.Properties.SaturationFactor.SetValue(saturationAmount / 100f);
saturationEffect.Properties.LightnessDelta.SetValue(lightnessAmount / 100f);
Notice that we are "chaining" our effects by supplying the results of the Brightness/Contrast effect to the input of the
Hue/Saturation effect.
Next, we'll need the "Temperature / Tent" effect:
TemperatureAndTintEffect temperatureAndTintEffect = new TemperatureAndTintEffect(deviceContext);
temperatureAndTintEffect.Properties.Input.Set(saturationEffect);
temperatureAndTintEffect.Properties.Temperature.SetValue(temperatureAmount / 100f);
temperatureAndTintEffect.Properties.Tint.SetValue(tintAmount / 100f);
Finally, we will implement the "Black and White" conversion, like so:
GrayscaleEffect grayscaleEffect = new GrayscaleEffect(deviceContext);
grayscaleEffect.Properties.Input.Set(temperatureAndTintEffect);
return grayscaleEffect;
But, we don't always want to convert to black and white. We need to put a check in there and only run this code if the
Black and White check box is checked.
We will check the bwAmount variable and if it's not checked, we will return out of the effect early, like this:
if (!bwAmount)
{
    return temperatureAndTintEffect;
}
We will put that bit just above the GrayscaleEffect block.
If you've been following along, your final script should look like this:
#region UICode
IntSliderControl brightnessAmount = 0; // [-100,100,5] Brightness
IntSliderControl contrastAmount = 0; // [-100,100] Contrast
IntSliderControl hueAmount = 0; // [-180,180,2] Hue
IntSliderControl saturationAmount = 100; // [0,200,3] Saturation
IntSliderControl lightnessAmount = 0; // [-100,100,5] Lightness
IntSliderControl temperatureAmount = 0; // [-100,100,9] Temperature
IntSliderControl tintAmount = 0; // [-100,100,7] Tint
CheckboxControl bwAmount = false; // Black and White
CheckboxControl previewAmount = false; // Preview original image
#endregion

protected override IDeviceImage OnCreateOutput(IDeviceContext deviceContext)
{
    if (previewAmount)
    {
        return Environment.SourceImage;
    }

    PdnBrightnessContrastEffect pdnBrightnessContrastEffect = new PdnBrightnessContrastEffect(deviceContext);
    pdnBrightnessContrastEffect.Properties.Input.Set(Environment.SourceImage);
    pdnBrightnessContrastEffect.Properties.Brightness.SetValue(brightnessAmount / 100f);
    pdnBrightnessContrastEffect.Properties.Contrast.SetValue(contrastAmount / 100f);

    PdnHueSaturationLightnessEffect saturationEffect = new PdnHueSaturationLightnessEffect(deviceContext);
    saturationEffect.Properties.Input.Set(pdnBrightnessContrastEffect);
    saturationEffect.Properties.HueAngleDelta.SetValue(hueAmount);
    saturationEffect.Properties.SaturationFactor.SetValue(saturationAmount / 100f);
    saturationEffect.Properties.LightnessDelta.SetValue(lightnessAmount / 100f);

    TemperatureAndTintEffect temperatureAndTintEffect = new TemperatureAndTintEffect(deviceContext);
    temperatureAndTintEffect.Properties.Input.Set(saturationEffect);
    temperatureAndTintEffect.Properties.Temperature.SetValue(temperatureAmount / 100f);
    temperatureAndTintEffect.Properties.Tint.SetValue(tintAmount / 100f);

    if (!bwAmount)
    {
        return temperatureAndTintEffect;
    }

    GrayscaleEffect grayscaleEffect = new GrayscaleEffect(deviceContext);
    grayscaleEffect.Properties.Input.Set(temperatureAndTintEffect);
    return grayscaleEffect;
}
That's all there is to it. You have successfully chained together 4 GPU accelerated effects.
Finishing Up
Once you've got that working, remember to save your script! I wouldn't want you to lose any of your hard work.
"File > Save" your Combined.cs file.
If you'd like to make that plugin a permanent part of your Paint.NET installation, read:
How to Build a DLL from a CodeLab script
How to install a DLL into Paint.NET
What's Next?
Head back to the Tutorial Index to learn something else
Donate
The best way to say "Thanks" for teaching you something here, is to fill out this form. It uses PayPal to process your donation. You don't need a PayPal account, just a credit/debit card will do.
If PayPal doesn't work for you, no need to worry--just enjoy the tutorials for free!
Thank you for your donation. I don't get many, so you can be sure I really appreciate yours!
|
|
|
News
CodeLab 6.12 Released
(February 11, 2024)
This latest release of CodeLab for Paint.NET includes the
ability to write GPU accelerated plugins.
More...
Double-Six Dominoes 3.1
(May 10, 2021)
This long-awaited refresh of the most popular dominoes game
on Download.com is now available!
More...
HTML Editor 1.5 Released
(March 31, 2016)
This latest release is a complete rewrite adding a wysiwyg editor mode and a much improved UI.
More...
|
|
|
|
|
|