|
How to Write a Paint.NET GPU Drawing Plugin
Let's examine the drawing plugin type
For the GPU Drawing type plugin, we will be using Direct2D drawing commands (such as DrawLine, DrawRectangle, DrawArc, and DrawText) to create our output.
We don't need to write to every pixel in the output. For pixels that we don't write, they will just remain transparent.
Go ahead and make a square selection, start CodeLab, then create a new GPU Drawing Effect by using the following menu:

GPU Drawing Effect Template
Here is the default drawing template. Currently it does nothing but draw all pixels from the source canvas (your canvas before any changes are made)
to the destination canvas (the canvas that holds the results of your drawing commands):
// Name:
// Submenu:
// Author:
// Title:
// Version:
// Desc:
// Keywords:
// URL:
// Help:
#region UICode
IntSliderControl Amount1 = 0; // [0,100] Slider 1 Description
IntSliderControl Amount2 = 0; // [0,100] Slider 2 Description
IntSliderControl Amount3 = 0; // [0,100] Slider 3 Description
#endregion

protected override unsafe void OnDraw(IDeviceContext deviceContext)
{
    // TODO: replace this DrawImage statement with your GPU Drawing statements
    deviceContext.DrawImage(Environment.SourceImage);
}
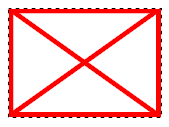
As a demonstration, let's write a plugin that will draw a red X from corner to corner of a selection.
Starting with our default template, we won't be needing a UI for this effect, so delete the following lines:
// Name:
// Submenu:
// Author:
// Title:
// Version:
// Desc:
// Keywords:
// URL:
// Help:
#region UICode
IntSliderControl Amount1 = 0; // [0,100] Slider 1 Description
IntSliderControl Amount2 = 0; // [0,100] Slider 2 Description
IntSliderControl Amount3 = 0; // [0,100] Slider 3 Description
#endregion
You can also delete that "TODO:" line.
Our CodeLab script should now look like this:
protected override unsafe void OnDraw(IDeviceContext deviceContext)
{
    deviceContext.DrawImage(Environment.SourceImage);
}
So far, the only thing our script does is preserve the background image of our selection by drawing the source image (our canvas before any changes are made)
to the output canvas which is pointed to by the "deviceContext".
OK, we're going to need to know the size and shape of our current selection. Let's add the following line to our script after the "DrawImage" command:
// find out where our selection is located
RectInt32 selection = Environment.Selection.RenderBounds;
This command grabs the current selection from the environment and puts it into the "selection" integer rectangle variable.
Next, since we will be drawing some lines, we'll need to define a brush and a stroke style. We will be creating a solid brush that is red in color.
Stroke style can hold all kinds of modifications to our line, such as the end cap styles, dash styles. We will keep this simple and just use the default style.
// define your brush and stroke style
ISolidColorBrush redBrush = deviceContext.CreateSolidColorBrush(LinearColors.Red);
IStrokeStyle redStrokeStyle = deviceContext.Factory.CreateStrokeStyle(StrokeStyleProperties.Default);
Copy those lines into your script just after the RectInt32 line.
Next, we will decide if we will be drawing Aliased or Antialiased lines. All we have to do is set the deviceContext AntialiasMode with our choice:
// setup drawing mode
deviceContext.AntialiasMode = AntialiasMode.PerPrimitive;  // or .Aliased
Copy those lines into your script just after the IStrokeStyle line.
Finally, we will need to draw some lines! First we'll draw the line from the upper left corner of the selection to the bottom right corner:
// draw your lines and shapes
deviceContext.DrawLine(
	selection.Left, selection.Top,
	selection.Right, selection.Bottom,
	redBrush, 5, redStrokeStyle);
Next, we will draw the line from the upper right corner of the selection to the bottom left corner:
deviceContext.DrawLine(
    selection.Right, selection.Top,
    selection.Left, selection.Bottom,
    redBrush, 5, redStrokeStyle);
And finally, we will draw a box around the entire selection.
deviceContext.DrawRectangle(
    selection.Left,selection.Top,
    selection.Width,selection.Height,
    redBrush, 5*2, redStrokeStyle);
You'll notice some math adjusting the width of the line we're sending into the DrawRectangle command. This is necessary
to adjust for the width of the line being drawn because half the line is drawn outside of the selection and then is clipped
to the selection itself. Since the selection variable contains the location and size of the marching ants selection and we
want to keep our lines inside of that selection, we need to double the actual width of the line.
So, if you've followed along, your final script should look like this:
protected override unsafe void OnDraw(IDeviceContext deviceContext)
{
    deviceContext.DrawImage(Environment.SourceImage);  // preserve background

    // find out where our selection is located
    RectInt32 selection = Environment.Selection.RenderBounds;

    // define your brush and stroke style
    ISolidColorBrush redBrush = deviceContext.CreateSolidColorBrush(LinearColors.Red);
    IStrokeStyle redStrokeStyle = deviceContext.Factory.CreateStrokeStyle(StrokeStyleProperties.Default);

    // setup drawing mode
    deviceContext.AntialiasMode = AntialiasMode.PerPrimitive;  // or .Aliased

    // draw your lines and shapes
    deviceContext.DrawLine(
        selection.Left, selection.Top,
        selection.Right, selection.Bottom,
        redBrush, 5, redStrokeStyle);
    deviceContext.DrawLine(
        selection.Right, selection.Top,
        selection.Left, selection.Bottom,
        redBrush, 5, redStrokeStyle);
    deviceContext.DrawRectangle(
		selection.Left,selection.Top,
		selection.Width,selection.Height,
		redBrush, 5*2, redStrokeStyle);
}
That's it!
Finishing Up
Now that you've finished your first GPU Drawing plugin, be sure to "File > Save" your RedX.cs file.
If you'd like to make that plugin a permanent part of your Paint.NET installation, read:
How to Build a DLL from a CodeLab script
How to install a DLL into Paint.NET
What's Next?
Now that you know a bit about the GPU Drawing effect, you can review any you missed:
How to write a Paint.NET Bitmap plugin
How to write a Paint.NET GPU Image plugin
How to write a Paint.NET GPU Drawing plugin
Or, Dig Deeper!
How to add a UI to your plugin
Donate
The best way to say "Thanks" for teaching you something here, is to fill out this form. It uses PayPal to process your donation. You don't need a PayPal account, just a credit/debit card will do.
If PayPal doesn't work for you, no need to worry--just enjoy the tutorials for free!
Thank you for your donation. I don't get many, so you can be sure I really appreciate yours!
|
|
|
News
CodeLab 6.12 Released
(February 11, 2024)
This latest release of CodeLab for Paint.NET includes the
ability to write GPU accelerated plugins.
More...
Double-Six Dominoes 3.1
(May 10, 2021)
This long-awaited refresh of the most popular dominoes game
on Download.com is now available!
More...
HTML Editor 1.5 Released
(March 31, 2016)
This latest release is a complete rewrite adding a wysiwyg editor mode and a much improved UI.
More...
|
|
|
|
|
|