|
How to Write a Paint.NET GPU Image Plugin
Let's examine the most popular plugin type
The GPU Image type plugin is used when you want to string together one or more GPU accelerated effects (like Gaussian Blur, Drop Shadow, or Vignette).
All of these effects work on the image as a whole, not pixel at a time, so they are very fast. In fact, they are executed on your computer's GPU
if you have one available.
Go ahead and start CodeLab, open an image, then create a new GPU Image effect by using the following menu:
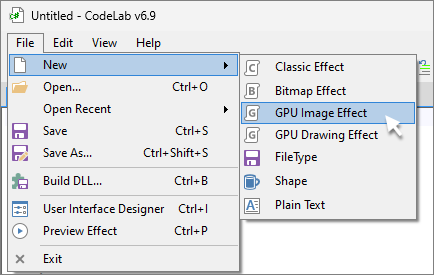
This will start a new effect with the GPU Image effect template.
GPU Image Effect Template
When using this template, it is up to us to prepare and return a bitmap image. Let's take a look at the default template:
// Name:
// Submenu:
// Author:
// Title:
// Version:
// Desc:
// Keywords:
// URL:
// Help:
#region UICode
IntSliderControl Amount1 = 0; // [0,100] Slider 1 Description
IntSliderControl Amount2 = 0; // [0,100] Slider 2 Description
IntSliderControl Amount3 = 0; // [0,100] Slider 3 Description
#endregion

protected override IDeviceImage OnCreateOutput(IDeviceContext deviceContext)
{
    // TODO: replace this return statement with your GPU pipeline algorithm
    return Environment.SourceImage;
}
Here you can see the line "return Environment.SourceImage;" simply returns the SourceImage--basically, it does nothing.
Let's design a GPU accelerated effect. For this example, we'll start with something simple, my Artistic > Dream plugin.
Before you start coding, it is important to work out what your plan for the plugin will be. I generally begin by tinkering around in Paint.NET
until I come up with a specific set of steps to accomplish my vision. Then, I draw a flowchart out on paper.
For Dream, we will implement the following plan:
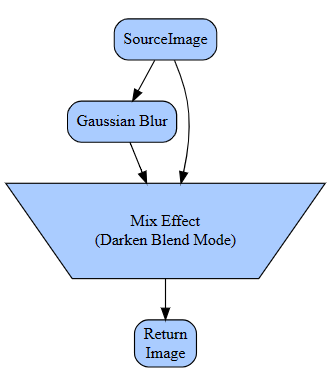
In this plan, we will string together Gaussian Blur and a Darken Blend mode.
How do you know what effects are available for use? Well, there are over one hundred of them.
Lucky for us, user toe_head2001 has compiled a reference spreadsheet:
→ Here is a spreadsheet that summarizes them all!
And, here is the official Paint.NET API documentation:
• Namespace PaintDotNet.Direct2D1.Effects
• Namespace PaintDotNet.Effects.Gpu
Let's start with the default script and replace the "TODO:" line with our implementation. Delete that "TODO:" line.
Looking at the default script, we won't have a UI, so you can delete all of these lines from the top of the script:
// Name:
// Submenu:
// Author:
// Title:
// Version:
// Desc:
// Keywords:
// URL:
// Help:
#region UICode
IntSliderControl Amount1 = 0; // [0,100] Slider 1 Description
IntSliderControl Amount2 = 0; // [0,100] Slider 2 Description
IntSliderControl Amount3 = 0; // [0,100] Slider 3 Description
#endregion
Our entire script should look like this right now:
protected override IDeviceImage OnCreateOutput(IDeviceContext deviceContext)
{
    // TODO: replace this return statement with your GPU pipeline algorithm
    return Environment.SourceImage;
}
The first thing we will need is the Gaussian Blur effect. Put the following line where the "TODO:" line used to be, that is, the first thing in our OnCreateOutput() function.
GaussianBlurEffect blurEffect = new GaussianBlurEffect(deviceContext);
Next, we will need to tell the Gaussian Blur effect what we want to blur. According to our plan, we want to supply the Source Image. It is done this way:
blurEffect.Properties.Input.Set(Environment.SourceImage);
Finally, we need to supply the parameters for the Gaussian Blur effect. According to the
documentation, it has one parameter that we need to specify, the standard deviation. Since we are more familiar with blur radius, let's convert a radius of 12
to a standard deviation like this:
blurEffect.Properties.StandardDeviation.SetValue(StandardDeviation.FromRadius(12));
All the other properties of the Gaussian Blur effect have defaults that are fine.
If you would like to see the result so far (just the blur) add a return statement to return the results of the blur effect. Like this:
return blurEffect; // for testing!
At this point, the full script should look like this:
protected override IDeviceImage OnCreateOutput(IDeviceContext deviceContext)
{
    GaussianBlurEffect blurEffect = new GaussianBlurEffect(deviceContext);
    blurEffect.Properties.Input.Set(Environment.SourceImage);
    blurEffect.Properties.StandardDeviation.SetValue(StandardDeviation.FromRadius(12));
    return blurEffect; // for testing!
}
Once you see the blurred image, you can remove the "return blurEffect; // for testing!" statement.
Next, we will need to chain together a Darken Blend Mode. You can use the MixEffect to blend layers.
After removing the "return blurEffect" line, replace it with a blank line. Then, follow it up with a new MixEffect:
MixEffect mixEffect = new MixEffect(deviceContext);
The MixEffect requires two inputs, one will be our original source image and the other will be the output of the blur effect. We specify them this way:
mixEffect.Properties.Destination.Set(Environment.SourceImage);
mixEffect.Properties.Source.Set(blurEffect);
When mixing these two layers together, think of the Destination layer as the bottom layer and the Source layer as the top layer in Paint.NET.
Notice how source of the mix effect is the output of the blur effect. This is referred to as "chaining". While this effect only chains two effects together,
your chain can be as long as necessary to accomplish your desired result. Some of my more complex effects chain together 20 or so effects--always the output
of the previous effect being the input of the next effect on down the line.
Finally, we need to tell the MixEffect what type of blend Mode we wish to do. Here's how to specify the Darken blend mode:
mixEffect.Properties.Mode.SetValue(MixMode.BlendDarken);
Taking a look at the documentation
for MixEffect, there is only one other property, AlphaMode. The default is "Premultiplied", which is fine for us. (More on this property in a later
tutorial.)
There is one last thing to do if we wish to see the results of the MixEffect, can you guess what this is?
That's right, we need to return the results of the mix effect.
So, if you've followed along, your final script should look like this:
protected override IDeviceImage OnCreateOutput(IDeviceContext deviceContext)
{
    GaussianBlurEffect blurEffect = new GaussianBlurEffect(deviceContext);
    blurEffect.Properties.Input.Set(Environment.SourceImage);
    blurEffect.Properties.StandardDeviation.SetValue(StandardDeviation.FromRadius(12));

	MixEffect mixEffect = new MixEffect(deviceContext);
    mixEffect.Properties.Destination.Set(Environment.SourceImage);
    mixEffect.Properties.Source.Set(blurEffect);
	mixEffect.Properties.Mode.SetValue(MixMode.BlendDarken);
	return mixEffect;
}
That's it!
Finishing Up
Now that you've finished your first Image plugin, be sure to "File > Save" your Dream.cs file.
If you'd like to make that plugin a permanent part of your Paint.NET installation, read:
How to Build a DLL from a CodeLab script
How to install a DLL into Paint.NET
What's Next?
Now that you know a bit about the GPU Image effect and the Bitmap effect, let's take a look at the GPU Drawing plugin:
How to write a Paint.NET Bitmap plugin
How to write a Paint.NET GPU Image plugin
How to write a Paint.NET GPU Drawing plugin ← next up!
Or, Dig Deeper!
Now that you've created your first GPU Image effect, let's dig a little deeper and learn how to add a simple UI to your effect:
How to add a UI to this plugin
Donate
The best way to say "Thanks" for teaching you something here, is to fill out this form. It uses PayPal to process your donation. You don't need a PayPal account, just a credit/debit card will do.
If PayPal doesn't work for you, no need to worry--just enjoy the tutorials for free!
Thank you for your donation. I don't get many, so you can be sure I really appreciate yours!
|
|
|
News
CodeLab 6.12 Released
(February 11, 2024)
This latest release of CodeLab for Paint.NET includes the
ability to write GPU accelerated plugins.
More...
Double-Six Dominoes 3.1
(May 10, 2021)
This long-awaited refresh of the most popular dominoes game
on Download.com is now available!
More...
HTML Editor 1.5 Released
(March 31, 2016)
This latest release is a complete rewrite adding a wysiwyg editor mode and a much improved UI.
More...
|
|
|
|
|
|