|
Effects Design Overview
How Paint.NET renders your effect
For the most basic scenario, that is when the selected effect doesn't have a user interface (UI), when you select an effect from Paint.NET's menu, it does two basic things: 1) it breaks up your current selection into rectangles of selected pixels, and 2) it calls that effect's Render() function once for each of those rectangles. Let's examine each of those things in turn:
ROI - Rectangle of Interest
When Paint.NET gets ready to call an effect, it breaks up the current selection into convenient work units (rectangles, really). We call these rectangles the Rectangles of Interest (ROI). Here's how Paint.NET might break up a circular selection into ROI
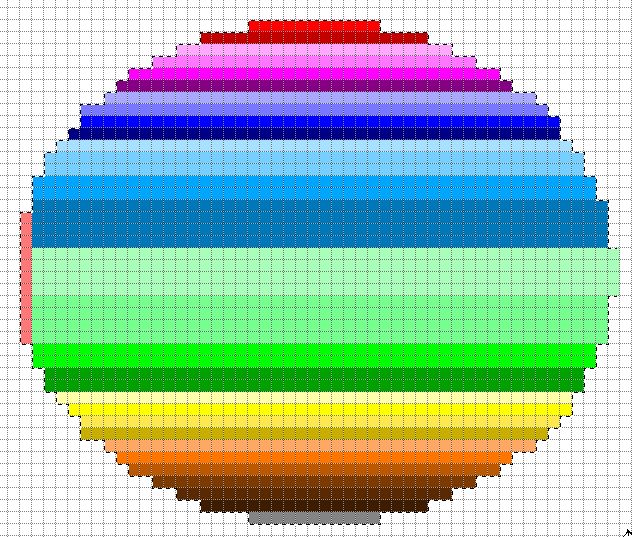
Each color represents a different ROI. They can be one or more lines tall and one or more columns wide. They can be different sizes. The only guarantee is that the ROI will be rectangular and all of the pixels in each of the ROI are part of the current selection (as shown by the marching ants).
Render() Function
The reason Paint.NET breaks up the selection into ROI and calls the Render() function with each individual ROI is for efficiency. Each call to Render() is done in it's own thread. Therefore, if your CPU has multiple cores, Paint.NET will take advantage of that by utilizing all of your cores to complete the effect as quickly as possible.
If all of this sounds very complicated and overwhelming, don't worry--you don't have to write the code that makes all of the muti-threading possible. That part is done for you. In order to create an effect, all you need to do is write the Render() function itself... and we have a template to get you started!
Let's take a look at a very basic Render() function:
void Render(Surface dst, Surface src, Rectangle rect)
{
    for (int y = rect.Top; y < rect.Bottom; y++)
    {
        for (int x = rect.Left; x < rect.Right; x++)
        {
            ColorBgra CurrentPixel = src[x,y];

            // TODO: Add pixel processing code here

            dst[x,y] = CurrentPixel;
        }
    }
}
NOTE: While it is possible to write Paint.NET plugins in different languages, most plugins are written in C#.NET and are developed using the CodeLab plugin. If you have not already done so, install the CodeLab plugin so that you can follow along with the lessons presented here.
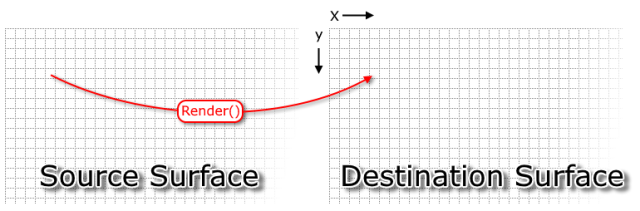
The first thing you'll notice about the Render() function is that there are three pieces of information passed into the function: the destination surface, the source surface, and the rectangle of interest. The most basic job of the Render() function is to write to every pixel on the destination surface within the bounds of the rectangle of interest. In order to do that, you have access to the entire source surface which holds the bitmap of your current layer before the effect began. Even though you have access to the entire destination surface, you should only write to the pixels that fall within the ROI.
Looking at the Render() function above, notice that there are two loops (one inside of the other). The outer loop, y, processes one row at a time of the ROI. Inside of that loop, there is another loop, x, that processes one column (pixel) at a time of the ROI. The loops stay within the current ROI by using the "rect" passed in that describes the location and size of the current ROI for this thread.
The line "CurrentPixel = src[x,y];" reads one pixel from the source surface into the CurrentPixel variable. The line "dst[x,y] = CurrentPixel;" stores that pixel onto the destination canvas. Your job is to use your imagination to come up with an algorithm to modify (or not) that pixel on it's way from the source canvas to the destination canvas. In order to do that, just replace the "// TODO:" comment line with your algorithm (formula).
I will not tell you that figuring out the algorithm for a desired effect is easy. But, once you complete all of the lessons here, you might find that it isn't as hard as you had imagined.
Now that you have a basic understanding of how Paint.NET works with effects, I think you're ready to dig into the lessons here and start creating your own effects!
How to Write an Effect Plugin (Part 1 of 4 - Simple)
How to Write an Effect Plugin (Part 2 of 4 - Intermediate)
How to Write an Effect Plugin (Part 3 of 4 - Complex)
How to Write an Effect Plugin (Part 4 of 4 - Odds and Ends)
How to Write an Effect Plugin (Part 5 of 4 - Beyond CodeLab)
How to Write an Effect Plugin (Part 6 - Adding Help)
How to Write an Effect Plugin (Part 7 - Additional Surface)
How to Write a Shape for Paint.NET (Part 8 - Writing Shapes)
How to add Tabs to your UI (Part 9 - Adding Tabs)
More Information
Here is some more information that you may find useful:
Sample Code for User Interface Elements
Using the Code Editor
Designing a User Interface for Your Effect
Building a DLL File
CodeLab Help File
Check for CodeLab Updates
Learn C#
|
|
|
News
Sudoku 1.2 Released
(April 19, 2026)
Solve sudoku puzzles for fun! Over 280 puzzles at all levels included.
More...
CodeLab 6.13 Released
(November 17, 2024)
This latest release of CodeLab for Paint.NET includes the
ability to write GPU accelerated plugins.
More...
Double-Six Dominoes 3.1
(May 10, 2021)
This long-awaited refresh of the most popular dominoes game
on Download.com is now available!
More...
|
|
|
|
|
|