|
CodeLab Tutorial Part 2 - Intermediate
How to create CodeLab plugins that require a UI
If you have not read part 1, go ahead. I'll wait...
How to Write an Effect Plugin (Part 1 of 4 - Simple)
OK, back? Good. Now, let's tackle something a little more interesting.
What if you had, in mind, an effect that requires some settable parameters? In this installment, I'll walk you through creating an effect that uses the standard 3 sliders UI found on many Paint.NET effects.
Go ahead and open CodeLab and take a look at the default script. At the top of the script, in the UICode region, you'll see the definition for three integer sliders:
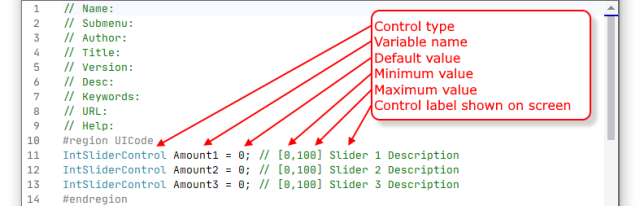
Normally, you would want to use the User Interface Designer (Ctrl+I) to tinker with the user controls your effect would need. However, in this case, we will be designing an effect with three integer sliders, so we practically have what we need already. All we have to do is change the minimum values and the control labels.
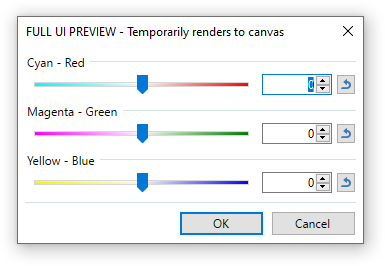
The effect that we will be creating is the Color Balance effect. It has the following user interface (UI):
Copy these lines below and paste them into your default script replacing the existing UICode region:
#region UICode
IntSliderControl Amount1 = 0; // [-100,100,6] Cyan - Red
IntSliderControl Amount2 = 0; // [-100,100,7] Magenta - Green
IntSliderControl Amount3 = 0; // [-100,100,8] Yellow - Blue
#endregion
Once you've done that, you can press Ctrl+I to play with those controls in the User Interface Designer.
OK, now that our effect has the 3 sliders we need, let's write the code that makes those sliders actually affect the image.
Looking at the Render() function, it has a few lines at the top of the code for some standard variables. We won't be needing any of that information, so go ahead and delete the following lines from your script:
// Delete any of these lines you don't need
Rectangle selection = EnvironmentParameters.SelectionBounds;
int centerX = ((selection.Right - selection.Left) / 2) + selection.Left;
int centerY = ((selection.Bottom - selection.Top) / 2) + selection.Top;
ColorBgra primaryColor = EnvironmentParameters.PrimaryColor;
ColorBgra secondaryColor = EnvironmentParameters.SecondaryColor;
int brushWidth = (int)EnvironmentParameters.BrushWidth;
Now, on to the real "meat" of our effect:
As you recall from the last lesson, we have a render function that loops through all of the pixels on the destination canvas. That descrbes this section from our default script:
for(int y = rect.Top; y < rect.Bottom; y++)
{
    for (int x = rect.Left; x < rect.Right; x++)
    {
        CurrentPixel = src[x,y];
        // TODO: Add pixel processing code here
        // Access RGBA values this way, for example:
        // CurrentPixel.R = (byte)PrimaryColor.R;
        // CurrentPixel.G = (byte)PrimaryColor.G;
        // CurrentPixel.B = (byte)PrimaryColor.B;
        // CurrentPixel.A = (byte)PrimaryColor.A;
        dst[x,y] = CurrentPixel;
    }
}
Looking at that code, you can see that is reads one pixel from the source canvas "CurrentPixel = src[x,y];" and writes it out to the destination canvas "dst[x,y] = CurrentPixel;". What we need to do is replace those // comment lines in the middle, with our algorithm. Go ahead and delete them now. Our source code should now look like this:
#region UICode
IntSliderControl Amount1 = 0; // [-100,100,6] Cyan - Red
IntSliderControl Amount2 = 0; // [-100,100,7] Magenta - Green
IntSliderControl Amount3 = 0; // [-100,100,8] Yellow - Blue
#endregion

void Render(Surface dst, Surface src, Rectangle rect)
{
    ColorBgra currentPixel;
    for (int y = rect.Top; y < rect.Bottom; y++)
    {
        if (IsCancelRequested) return;
        for (int x = rect.Left; x < rect.Right; x++)
        {
            currentPixel = src[x,y];
            // TODO: Add pixel processing code here
            dst[x,y] = currentPixel;
        }
    }
}
Since we are going to be working on the red "R", green "G", and blue "B" colors separately, we'll need some variables to hold our temporary values while we are computing our final values. We will just define them this way: int R, G, B;
Put that line above our loop like so:
#region UICode
IntSliderControl Amount1 = 0; // [-100,100,6] Cyan - Red
IntSliderControl Amount2 = 0; // [-100,100,7] Magenta - Green
IntSliderControl Amount3 = 0; // [-100,100,8] Yellow - Blue
#endregion

void Render(Surface dst, Surface src, Rectangle rect)
{
    ColorBgra currentPixel;
    int R, G, B;
    for (int y = rect.Top; y < rect.Bottom; y++)
    {
        if (IsCancelRequested) return;
        for (int x = rect.Left; x < rect.Right; x++)
        {
            currentPixel = src[x,y];
            // TODO: Add pixel processing code here
            dst[x,y] = currentPixel;
        }
    }
}
OK, now that the R, G, and B variables are available in the inner loop, let's finally tackle that "TODO:" line.
In order to do our pixel processing, first, we need to grab the current pixel's RGB values and put them into our temporary variables. Working only on the "TODO" section now, replace that line with this:
R = currentPixel.R;
G = currentPixel.G;
B = currentPixel.B;
How does this work? I'm glad you asked. When Paint.NET calls your Render() function, it passes in three things: the destination surface (dst), the source surface (src), and the rectangle of interest (rect). Our job is to write to ever pixel on the dst surface staying withing the bounds of the rectangle of interest (rect). That's the job of our x,y loops. The src surface contains the current layer before any changes are made and the dst surface is where we put our modified pixels. Each pixel is defined as a ColorBgra structure--that is, a 32 bit structure, 8 bits for the Red amount, 8 bits for the Green amount, 8 bits for the Blue amount, and 8 bits for alpha.
We are simply breaking that structure apart into the individual color components R, G, and B. Now we can adjust those values independently as integers.
Remember, our color wheel?
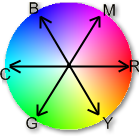
The arrows in the drawing represent the 3 sliders of our effect.
Red is a primary color and Cyan (a secondary color) is made of a combination of Green and Blue (two primary colors). Each of the 3 sliders is similarly a primary color on one end and a secondary color on the other.
The desired amount of "Red - Cyan" adjustment from our UI is located in the Amount1 variable. Now, let's use that amount to adjust our R, G, and B values.
When the user moves the slider toward Red, we will be getting a positive value in Amount1. So, we need to add that value to the R variable:
Since we have added to the Red amount, we need to subtract from the Green and Blue amounts. As Green and Blue share the same side of that slider, we will want to adjust them each half of the adjustment:
G = G - (Amount1 / 2);
B = B - (Amount1 / 2);
And, that handles the calculations for our first slider! Let's add that bit of code to our script right after we split the ColorBgra into it's parts. Our script should now look like this:
#region UICode
IntSliderControl Amount1 = 0; // [-100,100,6] Cyan - Red
IntSliderControl Amount2 = 0; // [-100,100,7] Magenta - Green
IntSliderControl Amount3 = 0; // [-100,100,8] Yellow - Blue
#endregion

void Render(Surface dst, Surface src, Rectangle rect)
{
    ColorBgra currentPixel;
    int R, G, B;
    for (int y = rect.Top; y < rect.Bottom; y++)
    {
        if (IsCancelRequested) return;
        for (int x = rect.Left; x < rect.Right; x++)
        {
            currentPixel = src[x,y];
            R = currentPixel.R;
            G = currentPixel.G;
            B = currentPixel.B;
            // Cyan - Red adjustment
            R = R + Amount1;
            G = G - (Amount1 / 2);
            B = B - (Amount1 / 2);

            dst[x,y] = currentPixel;
        }
    }
}
In order to see the results on the canvas, we need to reassemble the R, G, B, and alpha values back into a ColorBgra pixel. We can accomplish that with the following line:
currentPixel = ColorBgra.FromBgraClamped(B,G,R,currentPixel.A);
This line creates a new ColorBgra pixel from the individual R, G, B, and alpha components. And, because we're using the "Clamped" version of the function, if any of our values go above 255, they are clamped to 255 and if any of our values go below 0, they are clamped to 0.
Notice that because we are not modifying the alpha level of our pixels, we simply use the original pixel's alpha level when creating our new color.
Place this line above the "dst[x,y] = currentPixel;" line in order to see it in action. Once you've added this line to your code, you can press Ctrl+P to preview the effect and play with the "Cyan - Red" slider to see it work.
Now that we're happy with the way that works, let's implement the second and third sliders:
// Magenta - Green adjustment
G = G + Amount2;
R = R - (Amount2 / 2);
B = B - (Amount2 / 2);
// Yellow - Blue adjustment
B = B + Amount3;
R = R - (Amount3 / 2);
G = G - (Amount3 / 2);
Similar to the way we calculate the "Cyan - Red" changes, we do the same thing with "Magenta - Green" (Amount2) and "Yellow - Blue" (Amount3).
Place that code just after our "Cyan - Red" adjustment code. Our script should now look like this:
#region UICode
IntSliderControl Amount1 = 0; // [-100,100,6] Cyan - Red
IntSliderControl Amount2 = 0; // [-100,100,7] Magenta - Green
IntSliderControl Amount3 = 0; // [-100,100,8] Yellow - Blue
#endregion

void Render(Surface dst, Surface src, Rectangle rect)
{
    ColorBgra currentPixel;
    int R, G, B;
    for (int y = rect.Top; y < rect.Bottom; y++)
    {
        if (IsCancelRequested) return;
        for (int x = rect.Left; x < rect.Right; x++)
        {
            currentPixel = src[x,y];
            R = currentPixel.R;
            G = currentPixel.G;
            B = currentPixel.B;
            // Cyan - Red adjustment
            R = R + Amount1;
            G = G - (Amount1 / 2);
            B = B - (Amount1 / 2);
            // Magenta - Green adjustment
            G = G + Amount2;
            R = R - (Amount2 / 2);
            B = B - (Amount2 / 2);
            // Yellow - Blue adjustment
            B = B + Amount3;
            R = R - (Amount3 / 2);
            G = G - (Amount3 / 2);
            currentPixel = ColorBgra.FromBgraClamped(B,G,R,currentPixel.A);
            dst[x,y] = currentPixel;
        }
    }
}
...and we're done!
Note: This code could be made more efficient, but I wanted to leave it in a state that it would be readable for a beginner.
BTW, if you have any errors in your code, they will appear in the window below your code. Double-click on the first error message and you will be taken to the place in your code that has the issue.
You will probably want to play around with your effect in CodeLab and tinker with it until you are satisfied that it works correctly. That's what CodeLab is for!
Now, the fun part... time to create a DLL of our effect so that we can share it with all of our friends!
Since your code is in CodeLab, and working well, go back and make sure your first 3 lines (that describe the sliders) are correct. You may have changed them when tinkering with your code during the testing phase.
Once everything is good, follow the instructions on the Build a DLL page to make your new effect part of your Paint.NET permanently or share your DLL with your friends.
I hope you've enjoyed this installment.
Once you understand this tutorial, you're probably ready for the next part:
How to Write an Effect Plugin (Part 3 of 4 - Complex)
More Information
Here is some more information that you may find useful:
CodeLab Effects Design Overview
Sample Code for User Interface Elements
Using the Code Editor
Designing a User Interface for Your Effect
Building a DLL File
CodeLab Help File
Check for CodeLab Updates
Learn C#
|
|
|
News
Sudoku 1.2 Released
(April 19, 2026)
Solve sudoku puzzles for fun! Over 280 puzzles at all levels included.
More...
CodeLab 6.13 Released
(November 17, 2024)
This latest release of CodeLab for Paint.NET includes the
ability to write GPU accelerated plugins.
More...
Double-Six Dominoes 3.1
(May 10, 2021)
This long-awaited refresh of the most popular dominoes game
on Download.com is now available!
More...
|
|
|
|
|
|