|
CodeLab Tutorial Part 3 - Complex
How to use effect composition in CodeLab to create complex effects
If you haven't already done so, please go back and review the following:
Part 1 - Simple
Part 2 - Intermediate
Back? OK, good. Now that you've mastered those effects, it is time to move on to something a little more "complex."
Part 3 - Complex Effects
Now that you understand the basics of what can be done with a plugin and you know how to add a UI, let's tackle something a little more "complex".
Get ready to have your mind blown... effects you design can call other effects and adjustments as part of their algorithm! We call these type of effects "complex"--not because they are difficult to write, but because the algorithm is more advanced that what you've seen so far.
Complex effects can be as simple or as complicated as you like. In fact, they can use as many built-in effects, adjustments, and blend modes as you need to accomplish your task. This is sometimes called "effect composition".
If you find yourself repeating the same actions over and over again in Paint.NET, that might be a good candidate for a complex effect. Here is a good discussion of what you can and can't do in a Paint.NET plugin.
How Effects ACTUALLY Work
Before we go any deeper into building a complex effect. Let's take a moment to understand exactly what Paint.NET does when your effect is running.
The first thing Paint.NET does is build a UI for you from the definitions we've given it in the UICode block. It calls OnCreatePropertyCollection() to create all of the UI controls and OnCreateConfigUI() to assign all of the control labels and rules ("Enabled when" type stuff). Then it calls the OnSetRenderInfo() function to load the values from the UI controls into the variables your code will be using whenever a user changes one of the UI controls. Next, OnSetRenderInfo() calls your PreRender() function--this gives you a chance to prepare anything your Render() function will need to get it's job done. PreRender() is called in a single thread, then Render() is called mult-threaded. So, you want to minimize what is in PreRender() because it runs slowest.

Up until this point in the lessons, we haven't put anything in the PreRender() function. But, that is going to be the basis for the complex effect pipeline.
PreRender()
OK, so now we know that when a user adjusts one of our controls, Paint.NET calls the OnSetRenderInfo() function (which we don't have access to in CodeLab) but, it calls the PreRender() function (which we DO have access to). When that's done, Paint.NET calls the Render() function which we definitely have access to as we need to actually write that one.
That gives us two places to put code:
PreRender() - where we need to get our extra surfaces ready for the Render() function
and
Render() - where we use our extra surfaces and the source surface to create our result
If these last 2 sections are a bit confusing, don't worry about it for now. When you need to understand them better, you can come back here and review them. As you get more expirence coding effects, you'll gain a deeper understanding of how effects work. In fact, you may become better at optimizing the design of your effect than CodeLab. But, for now, we will be letting CodeLab make these decisions for us.
Our First Complex Effect - Dream
Let's choose a simple design for our first complex effect: Dream
The design of Dream is easy because we only need to call one built-in effect (Gaussian Blur) and use one blending mode (Darken) to make it work:
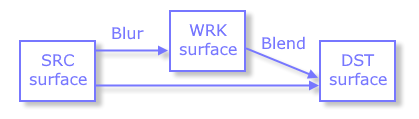
You can see how this will work by opening an image in Paint.NET and duplicating the layer. On the top layer, Gaussian Blur the layer by a radius of 10. Then, change the top layer's blend mode to "Darken".
Now that you know what to expect, let's start fresh and build our first complex effect.
File New Templates
Open a sample image in Paint.NET and open CodeLab. In CodeLab, use File > New > Effect to start designing our new effect. You'll see the following screen:
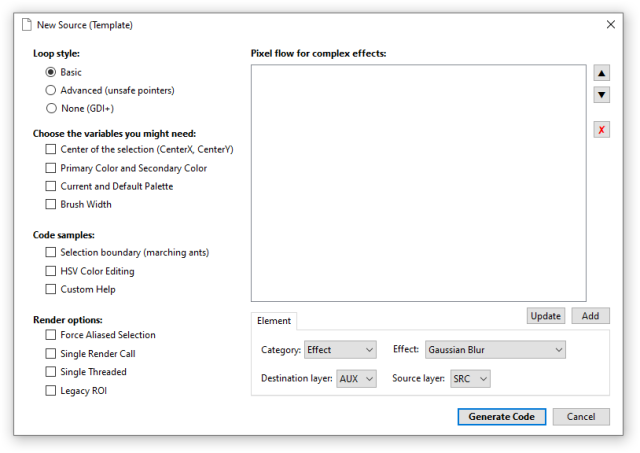
For now, we will be ignoring everything on the left half of the screen--I'll cover that stuff in future lessons.
In previous lessons, you've seen CodeLab's default script. The purpose of this screen is to create a script for you that contains everything you'll need to write a complex effect. The large box in the center of the screen is where we will try to replicate our plugin's design one element at a time.
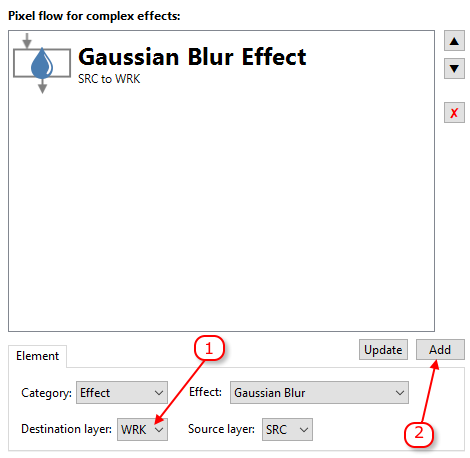
If you recall from our design, the first thing we need to do is to Gaussian Blur the SRC surface to the WRK surface. We can accomplish that by selecting the specifications for our "Element" below the box and clicking the [Add] button. Once you add the element to our list, it should look like this:
The next step in our design is to blend the SRC layer with the WRK layer and store the results to the DST layer so we can see the results. Change the Category to Blend, select Darken blend, make sure the layers are correct and click the [Add] button. Your screen show now look like this:

Once your pixel flow looks good, click the [Generate Code] button. CodeLab will write this exact script for you:
// Name:
// Submenu:
// Author:
// Title:
// Version:
// Desc:
// Keywords:
// URL:
// Help:
#region UICode
IntSliderControl Amount1 = 10; // [0,100] Gaussian Blur Radius
#endregion

// Working surface
Surface wrk = null;

// Setup for calling the Gaussian Blur effect
GaussianBlurEffect gaussianblurEffect = new GaussianBlurEffect();
PropertyCollection gaussianblurProps;

// Setup for selected blending op
private BinaryPixelOp darkenOp = LayerBlendModeUtil.CreateCompositionOp(LayerBlendMode.Darken);

protected override void OnDispose(bool disposing)
{
    if (disposing)
    {
        // Release any surfaces or effects you've created
        wrk?.Dispose(); wrk = null;
        gaussianblurEffect?.Dispose(); gaussianblurEffect = null;
    }

    base.OnDispose(disposing);
}

// This single-threaded function is called after the UI changes and before the Render function is called
// The purpose is to prepare anything you'll need in the Render function
void PreRender(Surface dst, Surface src)
{
    if (wrk == null)
    {
        wrk = new Surface(src.Size);
    }

    // Gaussian Blur
    gaussianblurEffect.EnvironmentParameters = EnvironmentParameters;
    gaussianblurProps = gaussianblurEffect.CreatePropertyCollection();
    PropertyBasedEffectConfigToken gaussianblurParameters = new PropertyBasedEffectConfigToken(gaussianblurProps);
    gaussianblurParameters.SetPropertyValue(GaussianBlurEffect.PropertyNames.Radius, Amount1);
    gaussianblurEffect.SetRenderInfo(gaussianblurParameters, new RenderArgs(wrk), new RenderArgs(src));
    if (IsCancelRequested) return;
    gaussianblurEffect.Render(new Rectangle[1] {wrk.Bounds},0,1);
}

// Here is the main multi-threaded render function
// The dst canvas is broken up into rectangles and
// your job is to write to each pixel of that rectangle
void Render(Surface dst, Surface src, Rectangle rect)
{
    // Darken Blend the src surface and the wrk surface to the dst surface
    darkenOp.Apply(dst, wrk, src, rect);


    // Step through each row of the current rectangle
    for (int y = rect.Top; y < rect.Bottom; y++)
    {
        if (IsCancelRequested) return;
        // Step through each pixel on the current row of the rectangle
        for (int x = rect.Left; x < rect.Right; x++)
        {
            ColorBgra SrcPixel = src[x,y];
            ColorBgra WrkPixel = wrk[x,y];
            ColorBgra DstPixel = dst[x,y];

            ColorBgra CurrentPixel = DstPixel;

            // TODO: Add additional pixel processing code here


            dst[x,y] = CurrentPixel;
        }
    }
}
Once you are back in the main CodeLab screen, you should see the dream effect on your selected layer!
That's all there is to it!
As in previous lessons, if you want to make this effect a permanent part of your Paint.NET, follow these instructions to build a DLL from your script.
Astute students will have noticed that the x,y loops in the Render() function above are not doing anything. So, you can delete the following section from your generated script and it will run a little bit faster:
    // Step through each row of the current rectangle
    for (int y = rect.Top; y < rect.Bottom; y++)
    {
        if (IsCancelRequested) return;
        // Step through each pixel on the current row of the rectangle
        for (int x = rect.Left; x < rect.Right; x++)
        {
            ColorBgra SrcPixel = src[x,y];
            ColorBgra WrkPixel = wrk[x,y];
            ColorBgra DstPixel = dst[x,y];

            ColorBgra CurrentPixel = DstPixel;

            // TODO: Add additional pixel processing code here


            dst[x,y] = CurrentPixel;
        }
    }
When would you actually need that block of code? Hmmmm... let's see...
Our Second Complex Effect - Render Flames
Before beginning this effect, draw a black to white gradient on your canvas. Open CodeLab and use File > New > Effect to design a Render Flames effect, like so:
Enter the elements as shown above--remembering to carefully select the proper layers as you go.
When you've entered everything perfectly, click the [Generate Code] button. CodeLab will write your script for you and you should see some black-and-white flames on your layer.
In order to give those flames some color, we need to modify the generated Render() function like so:
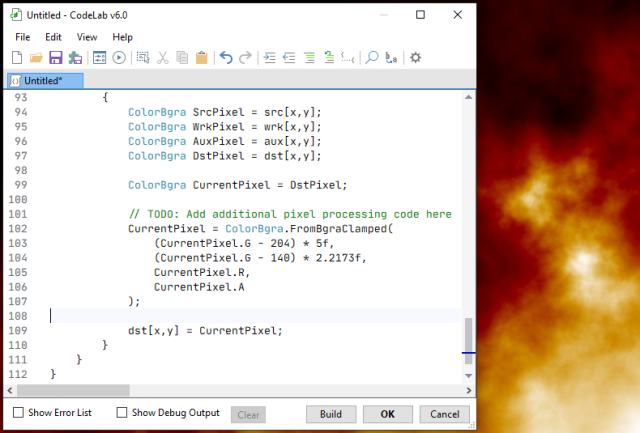
In order to add some color to those flames, we need to create a new pixel with color for each pixel that was generated by our algorithm above. We do that by adding the following code just below the "// TODO" line:
CurrentPixel = ColorBgra.FromBgraClamped(
    (CurrentPixel.G - 204) * (float)5,
    (CurrentPixel.G - 140) * (float)2.2173,
    CurrentPixel.R,
    CurrentPixel.A
);
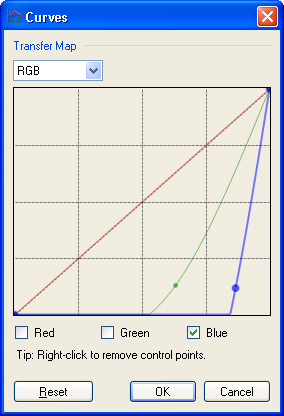
This line of code replaces the pixel read off the DST layer with a new pixel with the colors based on the current pixel. It is like modifying the layer by running the built-in curves command with settings like this:
And, we're done!
As in previous lessons, if you want to make this effect a permanent part of your Paint.NET, follow these instructions to build a DLL from your script.
What's Next?
What is beyond complex? Ha! You'll just have to wait for the next installment to find out. Until then, have fun thinking up and building complex effects!
Once you understand this tutorial, you're probably ready for the next part:
How to Write an Effect Plugin (Part 4 of 4 - Odds and Ends)
More Information
Here is some more information that you may find useful:
CodeLab Effects Design Overview
Sample Code for User Interface Elements
Using the Code Editor
Designing a User Interface for Your Effect
Building a DLL File
CodeLab Help File
Check for CodeLab Updates
Learn C#
|
|
|
News
Sudoku 1.2 Released
(April 19, 2026)
Solve sudoku puzzles for fun! Over 280 puzzles at all levels included.
More...
CodeLab 6.13 Released
(November 17, 2024)
This latest release of CodeLab for Paint.NET includes the
ability to write GPU accelerated plugins.
More...
Double-Six Dominoes 3.1
(May 10, 2021)
This long-awaited refresh of the most popular dominoes game
on Download.com is now available!
More...
|
|
|
|
|
|